Pages

Wednesday, November 30, 2011

Balance Scale Equalities and Inequalities

I know it sounds absurd, but no matter what age your child or student is (if they are old enough to be in school and doing math), you should be using the words "equality" and "inequality" to describe numbers that are equal or not equal. One simple way of doing this is to use a pan balance. You can differentiate these activities to use with students in K-8!

My students are regrouping when adding or subtracting 2 and 3-digit numbers. In order to help them understand that regrouping is not taking away or adding any numbers, but simply putting them in another place and form, I do something like this:
If you counted, you'd see ten cubes on one side and a rod (made of ten connected cubes) on the other side. The arrow points to the middle because the scale is balanced! 

To show greater than and less than, all you have to do is have the children count out the number of cubes and / or rods (or flats if you're working with hundreds) and see which side is heavier (goes down).

You can also do this with "missing number" or pre-algebra problems. Using the above picture, I would write a missing number sentence: 5 + __ = 10. Students would add cubes to the higher side (meaning that side of the scale is lighter, and thus represents a smaller number) until the balance showed both pans being equal. They would be able to find that 5+5=10. No more frustration, and no need to show students that they can use the inverse (10-5=___) to find the answer!

You can try this without having a pan balance or base-ten blocks / place value blocks at home...because I have found the websites for you! 

This site is called the Illuminations Pan Balance and it was created by the National Council of Teachers of Mathematics. You can start out by showing students how different shapes (instead of numbers) can have different masses. Therefore, the square is greater than / heavier than the triangle. I have used this with kindergarteners and they understand it! I used to have a worksheet that was made specifically for this site, but can't find it at the moment.

Next, you can show them that they have to add to the side that weighs less to balance it.

Students can reset the balance or complete different "sets" where the shapes have different masses OR you can have them try it with numbers.
As you can see, we just demonstrated the commutative property of addition - the order of the addends doesn't change the sum. We created an equality!

Now we've used the associative property of addition! 

Download some practice sheets here! This document is a pdf that includes harder problems and blank scales for students to create their own equalities.

Check out my other Making Math Memorable Posts!

Tuesday, November 29, 2011

Baby It's Cold Outside!

...not really! It's been about 65 degrees or warmer the last few days, which is about 20 or more degrees than our average -not your typical NJ November!

On to the topic of this post: teaching about warm and cold bloodedness!
This is another one of those science topics that I always got frustrated with because all I could really do was have my students make predictions and then have them do research or tell them which animal groups were cold-blooded and which were warm-blooded. There really wasn't anything past the knowledge part of Bloom's Taxonomy, and certainly no inquiry. I wanted my students to at least be able to explain how scientists prove how they know which animals have body temperatures that remain constant or change temperature according to their environment.
First I read The Magic School Bus Gets Cold Feet  to my students. They began to form a definition of what the two terms meant, which animals were cold-blooded, and which were warm-blooded. We used the Scholastic lesson plan and lab sheet that went along with the book. Click here to download it.

Then I came across The Infared Zoo at Cool Cosmos, a website created by the California Institute of Technology. It shows students infared images of different animals taken at a teaching zoo. These pictures show a lizard - and how its body temperature has changed over time. Students use the color key to determine an estimate of the body temperature of the animal and discuss why they think each part would be warmer or colder, or what could cause an animal's temperature to drop or rise rather than staying constant.


Click the logo to visit the site!

Check out lesson plans that go with the site!

Check out my animal classification post here.

Monday, November 28, 2011

Animal Classification

Most of the time, when we teach children how to classify animals, we talk about their body coverings. But there's so much more to it than that! I found this great site that teaches students how to tell the difference between animal classes (resist the urge to say "Groups") and also gives them a fun computer game to play. It's also interactive board-friendly so I put it up on my Promethean Board. Please note that the site only covers animals that are vertebrates. Enjoy! 


Click here or on the picture to play the Animal Classification Game!

Check out other animal websites that I have compiled.

Check out my post on classifying animals as vertebrates and invertebrates!

Sunday, November 27, 2011

What's inside animals?

Teaching Kids about Vertebrates and Invertebrates

I just had to share this great product that I came across last year while teaching science lab. I always struggled with how to teach students to identify animals as vertebrates or invertebrates. I wanted to go past the knowledge part of Bloom's so that kids knew more than just the difference between the two and the purpose for backbones. I found a product called What's Inside Animals?
It's available in a lot of places, including Amazon. I got mine for about $30, but right now they are on sale. All students have to do is hold a card with the picture facing them and the back facing a light source. They can see a backbone through the picture! Here are some pictures of my students using them:


I found that they work best when you use a flashlight shined behind them in a dark room, but you can also hold them up to a ceiling light source!

I also use www.eskeletons.org, a site from the University of Texas at Austin. It allows students to compare skeletons of mammals while learning about animal classification. It can also be used in an evolution discussion.

The vocabulary is advanced, but trust me I did this with second and third graders and they loved it! They were able to compare and contrast the bones and started naming the body parts!

Check out another post on dinosaur bones and fossils here.

Saturday, November 26, 2011

The Harvest Birds

One of our upcoming reading stories is called The Harvest Birds.
The story is about Juan Zanate, the youngest of three Mexican boys in a family. When Juan's father dies, he leaves his land to his two eldest sons. Juan gets his turn to work a small piece of land given to him by an old man in town, and becomes much more successful than his brothers with the help of zanate birds. Juan learns a lesson of patience, hard work, and the importance of working with nature as he makes his dream of becoming a farmer and land owner come true. 

video of a zanate bird

In celebration of the harvest, we created these scarecrow glyphs. Students had to color according to the directions and we soon found that no two scarecrows were identical, just as no two students are exactly the same! I used a scarecrow and fake fall leaves for the bulletin board border.

Download a glyph with a scarecrow pattern and directions here. Download glyphs here or here.

For more Harvest Birds Activities, check out my class website!

Wednesday, November 23, 2011

Happy Thanksgiving!

Wishing you a Happy Thanksgiving! I really love this holiday because it's the one of the few holidays that people don't give gifts and most people a huge effort to spend it with family.

This morning we made these simple turkeys using Scholastic Book orders (why do they send like 4 of the same catalog?!?) folded accordion style. 

Students just color and cut the turkey out, then staple the legs to the bottom and the hat to the "feathers" and you're done. Use two pages if you want the feathers to be fuller than ours.

We also made these cornucopias. Students wrote what they were thankful for inside, then glued their writing to a piece of paper along with fruits and vegetables they colored and cut out.

A student I tutor also did this in his class...and the first thing he wrote he was thankful for was "Ms. Battista helping me with math" - oh how that warmed my heart!

 I am thankful for my amazing friends, family, and students. Life is great! :)

Sunday, November 20, 2011

Handy Handwriting Tools

    After reading The Teacher's Wife's handwriting post on creating homemade Handwriting Without Tears letters, I was inspired to post some handwriting materials that I found a few years ago. I purchased them for my twin sister to use when she was teaching resource room and myself a few years ago when a large majority of my class was struggling with reading and writing. I would spend a lot of extra time conferencing with certain children in writing workshop and noticed that the students who struggled the most also had the worst handwriting. EVERY single child that had difficulty seemed to form most of their letters from the bottom up instead of top down. Since we used plain writing paper, it was hard to tell students where to start forming their letters. Here are some materials that helped:
I just loooove these tactile letters. Children trace the plastic letters with their fingers and get feedback on whether they traced in the right direction or not. If you trace in the right direction, the letter feels smooth. If you trace in the wrong direction, the letter feels rough. What's even better is the vowels are red and the consonants are blue. In fact, my 7 year old niece just saw this post as I was typing it and asked, are those vowels?!
These sandpaper letters are great for my 5 year old niece, who needs the visual cues on which direction to trace because she hasn't had enough writing practice yet to know on her own. You can make these on your own very easily with index cards, glue, and a marker or pen. The white dot on the bottom is used to help them position the card so it isn't upside down or sideways.


Once I corrected how their letters were being formed without actually writing, I started using Stationery Studio to make the actual writing paper more appropriate for where my third graders were. It's a great way to increase enthusiasm and motivation for writing and a fabulous way to differentiate decorative writing paper. You can print out several types of the same paper, deciding how far apart the lines are, if you want a midline, and even what color the lines are! Students can barely even notice a difference. It also allows students type their story using the software and print it out!


Now that I'm teaching third grade again, I also make my own handwriting practice sheets for our spelling words using Spelling City.

Try the following sites for more materials:

http://www.searchfreefonts.com/categories/dotted.htm


http://desktoppub.about.com/od/freefonts/tp/Free_Handwriting_School_Fonts.htm


http://www.handwritingforkids.com/handwrite/manuscript.htm


http://www.internet4classrooms.com/kplus_writing.htm

Link to this post if you have any other ideas you'd like to share!

Saturday, November 19, 2011

The Last Lecture - Be a Penguin

I continually find myself thinking about Randy Pausch (former Carnegie Mellon professor) and The Last Lecture - "Really Achieving Your Childhood Dreams." I first saw him on Oprah when he was still alive, watched the video, and then bought his book. Despite the fact that death and dying is a mature subject, I told my students the story about Randy and how he made his dreams of becoming a Disney Imagineer come true before he died of pancreatic cancer at age 47. I can never read the book, watch the videos, or even talk about his story without tearing up.
What I wanted them to get out of it was not only to never give up on their dreams, but also to "be a penguin." You see, Randy told his students that "even in the toughest of waters, one penguin had to be brave enough to take the first dive" and test the water, despite the risk of being eaten by seals, sharks, and killer whales. I can be caught frequently saying, "Who's going to be a penguin?" after asking a question that my students might not be confident in answering. They have really taken to the idea, and hands immediately shoot up when they remember what Randy said. What also inspired them was seeing the bridge that was built in his honor. It lights up in different colors and has cut outs of diving penguins, so seeing it makes them (and I'm sure his family and friends) feel like he won't be forgotten.
Watch the video of Randy's Last Lecture on Window's Media Player and other videos here.


"We cannot change the cards we are dealt, just how we play the hand."

The brick walls are there for a reason. The brick walls are not there to keep us out. The brick walls are there to give us a chance to show how badly we want something. Because the brick walls are there to stop the people who don’t want it badly enough. They’re there to stop the other people.”

“It's not about how to achieve your dreams, it's about how to lead your life, ... If you lead your life the right way, the karma will take care of itself, the dreams will come to you.”

“The key question to keep asking is, Are you spending your time on the right things? Because time is all you have. ”

"When you're screwing up and nobody's saying anything to you, that means they've given up on you."

"Experience is what you get when you didn't get what you wanted. And experience is often the most valuable thing you have to offer."

Purchase the Disney Edition (grades 6-12) to read with or to your students. Proceeds go to Randy's family.

Check out part of my "bucket" list of things to do before I "kick the bucket" (which I had already written, but started to put into action thanks to Randy). Do you have a bucket list? What's on it?

Thursday, November 17, 2011

Max's Words

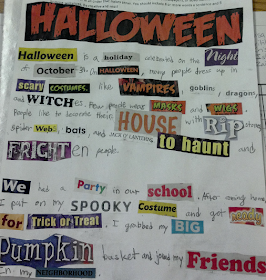
We just read the book Max's Words from our Journeys reading series. It's a story about a boy named Max who gets jealous of his brothers' stamp and coin collections. Max decides to collect words and comes up with a pretty neat way to write stories, while earning the admiration of his brothers.

My students were given an assignment to write a story using words cut out from newspapers, magazines, or mail advertisements just like Max. They had a ton of fun and came up with some great stories! This is a neat activity to do as a center or for homework over a long break. Enjoy!

Story 1


Story 2


Story 3

Story 4


Story 5


Story 6

Story 7

Story 8

For more activities to go to with Max's Words, check out my class website.